A Designer's Take on Medical Clipart Icons for Embroidery
When a new embroidery design lands on my screen, my first question is always: where does this live in the real world? I’m not just looking at pixels; I’m imagining thread on fabric, a finished product in someone’s hands, and the reaction it gets. So, let’s put Medical Clipart Icons through that lens.
The Immediate Mood: Clean, Recognizable, and Professionally Friendly
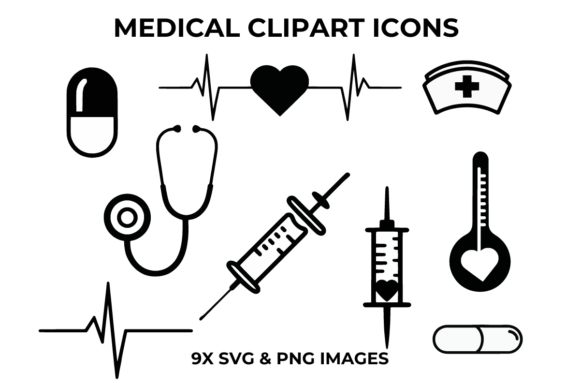
Opening this set, the first impression is clarity. These are sharply rendered graphics with a straightforward, almost classic clipart style. The mood isn’t overly cartoonish or too technical—it sits nicely in a space of friendly professionalism. Icons like the syringe, heartbeat, and stethoscope are immediately recognizable, which is a huge plus. In embroidery, especially for gifts or products meant for a specific audience (nurses, doctors, medical students, caregivers), instant recognition builds trust and connection. The visual personality is clean and versatile, suggesting it wouldn’t overpower a project but rather serve as a clear, thematic anchor.
Natural Project Pairings: Where These Icons Would Thrive
My mind immediately goes to personalized gifts and small shop merchandise. Picture a custom embroidered tote bag for a nurse graduating from her program, with a neat row of these icons along the bottom. Or a minimalist patch featuring just the stethoscope and heartbeat, applied to a denim jacket. For a baby item in a medical family, a single, small nurse’s hat icon on a blanket corner feels sweet and subtle.
These Medical Clipart Icons are perfect for projects where the theme needs to be communicated clearly without heavy text. They’d excel on:
- Apparel decorators could use them on the sleeves of sweatshirts or the chest of t-shirts for medical office teams.
- Small business owners crafting kitchen towels or aprons for a boutique hospital gift shop.
- Creative entrepreneurs making holiday gifts for a doctor—think a festive pillow with a subtle medical icon among other patterns.
- Etsy sellers could create entire lines: embroidered caps for nurses, simple tea towels with a syringe icon for a pharmacist, or printable mockups for digital product sellers offering medical-themed branding assets.
Thinking Through the Stitch: Practical Embroidery Considerations
This is where design files meet reality. The sharp rendering mentioned in the description suggests clean lines, which generally translates well to satin stitches for borders and fill stitches for larger areas. However, with any icon set, the detail level is key.
I would strongly advise testing Medical Clipart Icons on scrap fabric first. Check those small details—the tip of the syringe, the curves of the heartbeat line, the details on the nurse’s hat. On a small hoop size, some intricate corners might need a slight simplification in your machine settings to prevent thread breaks or overly dense stitches.
For textured fabrics like sweaters or on stretchy fabrics for baby clothes, a good stabilizer is non-negotiable to keep these clean shapes crisp. On dark fabric, consider thread color contrast carefully; a white or light grey fill stitch on a black sweatshirt could make these icons pop beautifully, but you must ensure the stitch density is sufficient to prevent the background fabric from showing through and dulling the sharpness.
Where to Use With Care: Navigating Potential Pitfalls
While versatile, some applications require extra thought. Embroidering these onto curved surfaces like caps demands attention to placement—a central icon might work better than a row. Tiny lettering isn’t mentioned here, but if any icons incorporate minute text, I’d likely avoid it or enlarge the design section.
Layered garments or products needing frequent washing, like work uniforms, need durable stitching. A denser fill stitch on these icons might hold up better, but it also adds weight. It’s a balance. For thin fabrics, lighter stabilizers and potentially reducing the overall design size might be necessary to prevent puckering.
The Value They Add: From Craft to Customer
Using a design like this isn’t just about stitching; it’s about the final product’s story. For a handmade presentation, these clean icons lend a sense of professionalism and thoughtfulness. A customer receiving a personalized gift with a well-embroidered medical icon feels the maker understood their profession or passion—it boosts giftability and personal connection.
For a craft business, consistency is key. If you’re building a line of medical-themed products, Medical Clipart Icons provides a cohesive set of design assets to create brand recognition across tote bags, patches, and apparel. This consistency builds customer trust and makes your Etsy listings or craft fair booth look curated.
In commercial embroidery projects, such as logos for small clinic staff uniforms, the clarity and recognizability directly affect professionalism. A sharply stitched, familiar icon communicates competence quickly.
Essential Designer Notes Before You Hoop the Fabric
Before you run this embroidery file, make a checklist:
- Always test on scrap fabric of the same type and color as your final project.
- Check thread color contrast in both light and dark fabric mockups. A quick black-and-white digital preview can help assess form clarity.
- Review the implied stitch density in the preview. Are large fill areas present? Plan your stabilizer accordingly.
- Confirm the hoop size you intend to use is appropriate for the detail size. The product notes mention “9x S,” but always verify the actual dimensions and compatibility with your machine.
- Inspect the smallest elements in the design preview. Will they stitch out clearly at your intended size?
- Most crucially: check the licensing terms for this design. If you plan to sell the finished embroidered items or use it in digital product previews for sale, you must confirm it’s allowed. Never assume.
Medical Clipart Icons presents a solid, thematic foundation for a wide range of projects. Its strength is in its clear communication and versatile style. By approaching it with practical embroidery considerations—fabric, stitch, size, and license—you can transform this digital graphics set into tangible products that resonate deeply with your audience, whether it’s a single heartfelt gift or a line of bestselling small shop merchandise.